Summary We worked on a number of things this week. As far as the whiteboards/drawing aspect of our project is concerned, we resolved some issues we were having with textures not looking right. On the networking side of things, we figured out how to transfer files from a PC over the internet and onto the Magic Leap headset. We also worked on text display this week. Currently, the text can be displayed in a reasonable font size that is similar to the size of text on an actual piece of paper. There is also a white background behind the text, and the text color is black. Finally, we worked on collision detection this week. Specifically, we were trying to figure a way for the windows to interact with physical planes. We got the collision detection part working with the use of kinematic colliders and rigidbodies. Progress This week, one of our focuses was on building a virtual whiteboard-like object that has drawing capabilities incorporated. We started out by using a 3D plane object to model a whiteboard. For displaying pixels on the whiteboard, we instantiated a new Texture2D object in our script file and had the 3D plane object reference the Texture2D. Thus, by setting the x and y pixel values of the Texture2D object, the pixel would be displayed on top of the plane. However, we encountered two issues on our way The first issue with applying a new texture to a Unity game object was the inconsistency in pixel values that were being displayed. For instance, when plotting a blue pixel across a 3D plane, the bottom pixels were darker than the top pixels. This was due to the bilinear interpolation of the scaled pixel value. The solution to this was setting the texture filter mode to Point(No filter) under the texture’s Inspector tab. Although the inconsistent pixel values were taken care of, the texture still had pixelation and blur. In order to find the source of this issue, we tried creating a checker pattern image as a texture to see how the image show up on the Magic Leap device. We observed the checker pattern not even showing up clearly and blended into the game object. The reason behind this was due to the generation of mipmaps. Mipmaps are a pre-calculated series of downsampled versions of an image. When using mipmaps, the texture value is interpolated using the appropriate level of the mipmap depending on how far the texture is positioned. Therefore, in order to solve this issue, check the texture inspector and go onto the advanced settings to make sure the Generate Mip Maps option is disabled.  Also the Mipmap generation can be disabled programmatically as well in cases when we have to create different textures dynamically during the runtime of our application.  Once the texture was displayed on top of the plane properly, we were able to draw points at arbitrary x and y locations while the controller’s trigger was pressed. We will integrate this code with the controller raycast code in order to draw pixels at the x and y location where the raycast intersects with the plane. We also worked on file transfer this week. In our last networking demo, we managed to get the Magic Leap headset to make HTTP requests to an existing website. This week, we switched from contacting an existing website to contacting our own server. On the Magic Leap side of things, this mostly just meant changing the requested URL. There was one complication though--for a long time, the headset wasn’t able to contact our server, even though we could contact our server from other PCs and our phones. Eventually, we realized that the problem was that the headset was connected to an unsecured network, and our server was server over HTTP (not HTTPS). For some reason, the Magic Leap headset appears to be blocking this combination. After we switched the headset over to a secure WiFi network, the requests went through successfully. Setting up the server was a bit more involved. As far as the networking side of things is concerned, our project has three components: 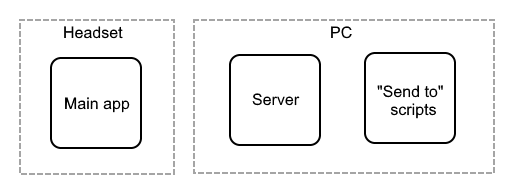 The main component is the app running on the headset. It repeatedly makes requests to a server running on a PC. When there are files queued up for transfer to the headset, the server will remove the next file from the queue and include it in the response. The third component is responsible for adding files to the queue. On the PC, we’ve added a “Send to” option to the file explorer. When you select some files and choose the option we’ve added, a script is run that sends the selected files to the server, adding them to the back of the queue. For the server, we’re using Node.js’s Express framework. It has endpoints for adding and removing from the queue. The server expects uploaded files to be base64 encoded. When it serves a file, it sends it base64-encoded, and the headset is responsible for decoding it. To create a new “Send to” option, we just needed to add a shortcut to a special directory. If you navigate to a file explorer window in Windows and enter “shell:sendto” into the address bar, you’ll end up at this directory, which is full of shortcuts. 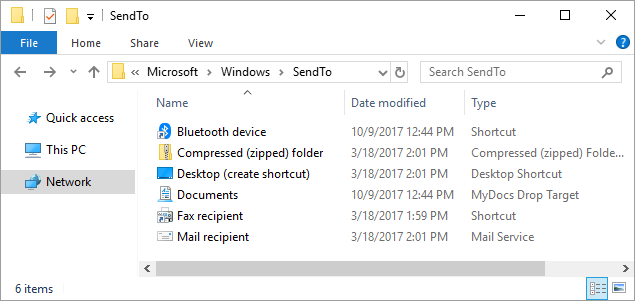 These shortcuts account for many of your “Send to” options. By adding a new shortcut in this directory, you can create a new option. Windows expects a “Send to” shortcut to be a shortcut to either an executable or a script with a registered file association (i.e., a script that can be run by double clicking it). The names of the selected files are passed as command line arguments to the executable/script. We wanted to run a JavaScript script using Node.js when our “Send to” option is selected, but Windows didn’t already associate JavaScript files with Node.js, so that didn’t work. It did work for Python scripts though, so we wrote a Python script that invokes Node.js with our script. We encountered a problem where choosing our “Send to” option would make a black console window with a Python icon pop up briefly. We were able to fix this by changing our Python script’s extension from .py to .pyw, which exists exactly for the purposes of not flashing a console window. But then we noticed a different console window pop up, this time with a Node.js icon. Node.js doesn’t currently have something like “.jsw” to prevent the window from popping up, but we found another way to hide the window. We’re using Python’s “subprocess” module to start Node.js, specifically it’s “call” function. If you pass the keyword parameter “creationflags” with value 0x08000000, that keeps the subprocess from creating a console window. The following video shows how this all looks. In the video, we first use the Postman tool to hit a debug endpoint of our server, which shows that the server has no files queued up. Then, we send two files to the server, and hit the debug endpoint again to show that the files made it to the server. Then we start up the Magic Leap app. After it removes a file from the queue, we check with Postman again and find that the transferred file has been removed. After the headset removes the second file, we check from Postman to confirm that the server’s queue is empty. Finally, we worked on text display. We are using TextMesh Pro for text display functionality. We found that this asset is able to display the text very clearly in a reasonable size. Here is a screenshot of what it looks like in the workspace:  Note that yhis screenshot does not reflect the actual clarity of the text. The actual text is very bright and easy to read. Plan for next week Next week, we have a presentation to give on our project, as well as an open house demo day to prepare for. Over the next several days, we’ll be working on bringing together the work that each team member has done individually into one project. Our goal is to get our MVP working. Here are the specifics regarding a couple of the features we’ll be working on:
0 Comments
|
Blog
|
 RSS Feed
